Tag Archives: stash busting

Old Baby Towels Turned Into Robes

14 Mar

image

I had a heaping stack of baby towels we were using on these  kids that did absolutely nothing for drying them or keeping them warm after showers anymore.  Apparently I don’t have babies anymore. In fact,  as of tomorrow,  I’ll have a 4 year old and a 5 (and a half) year old.  Yes,  not babies.  Not even close.
But I am a sucker for keeping fabric around, even if it’s in the form of hooded towels.  And you know what?  I’m glad I did.  Because I finally had the idea to turn all those towels into some robes for the kids. 
They love them.  I love them. Win. Win. 

(And this in no way is helping my fabric hoarding addiction)

What Happened to January AND February? !

28 Feb

It has certainly been too long since my last post but I promise it’s not for lack of sewing. I have been a busy bee!
I finally got myself a Renfrew during that fabulous birthday sale she had going on up there. Thank you Sewaholic, I’m not sure how I managed to survive this long without this pattern. I will be making a billion of these. Here’s my first one, I love it!  

image

I got an itch to purchase a high waisted swimsuit and decided to cut up a suit I already had instead. It’s way more flattering on my short torso than the original suit, I feel it is modest enough for me to feel comfortable and my husband approves. Win win win. I love the way it turned out! And I am excited for this negative degree weather to start hiking back up so Spring can come and then turn to Summer so I can take this baby for a swim. 

image

I’ve been slowly working on reorganizing my sewing room. I made a better work flow station, added a TV for Netflix and music (amazing addition! I’m currently working my way through Parenthood and it’s the best.show.ever) and added these organizers behind my machine to help organize my current projects. I love that I have a few clear pockets right in view to hold my booklets, measurements, and phone. It’s pretty daggon amazing, actually.

image

image

image

I am also trying to figure out what to do with my abundance of polyester. I have a closet full of fabrics I can’t get rid of but I probably won’t sew into wearable garments. I am finding that I enjoy the feel of fabrics and I put that above pattern If it’s not comfortable, I won’t wear it…even if it’s a really cool retro floral.
Over the holidays I won a pattern from The Brooklyn Pattern Company.  It’s adorable. I worked with some vintage cotton and an old men’s button up to make one for my daughter’s upcoming birthday. I haven’t gotten a final picture of it yet, but here’s a sneak peak.

image

To top it off I have altered a few of my spring wardrobe pieces and added an eyelet white peasant style top sewn from my stash and a vintage pattern. Pictures in the future.
There are a million more things I want to share but I think I’ll end here for now.

I really do hope to keep the blog more updated as I go along especially with how much of my wardrobe is becoming me made!

Minoru Sneak Peek (P.S. I’m Back!)

19 Sep

I’m back in the sewing room. and it feels gooood. Seriously, why, how, did I wait so long?!

I decided to get back in the game with a pretty big project. I decided I needed a jacket. and sewing a jacket has been on my list of things to sew for about 10 years. Speaking of which, I am squeaking in the last half a year before I turn 30 to stay true to my blog name 🙂 I’ve still got time, so I’m running with it.

Anyway, back to the jacket. I’m loving it so far, but I’m not yet half way through. I’m using fabric I already had in my stash from grandmother’s donations. A black speckled wool for the self fabric, and a cotton printed plaid for the lining. I have a slick synthetic of some kind cut out for the arm lining, but it might be a bit too thick, I haven’t decided yet.

I’m not finished yet, or even close! But, I wanted to go ahead and talk about the things I am doing this time around that are different. I’m taking my time and changing things up a bit. So, In no particular order:

  • I actually cut into the pattern this time. I have traced my fare share of patterns and it is pretty much the worst. I have yet to try the freezer paper method, and I do plan on trying that one, but this time I decided to cut out the biggest size and fold in to my size. That way I can unfold when I need to make another size and I don’t have to buy another pattern. That makes me happy. It worked out well, I thought. It’s not the easiest thing to move the pattern around with all the folds and snips, but it got the job done and I don’t feel like I ruined my pattern. Plus, double plus.

Sew20Something Sew20Something

  • When I cut out my fabric from the patterns, I used hand stitching  and tailor tacks to show the pattern details. Typically, I try everything possible not to hand stitch anything, but my other methods were not working on this fabric, and this pattern has so many important markers {elastic casings, mainly} that it was very important for me to mark everything and actually be able to find it later. I’m kinda terrible at hand sewing, I despise trying knots, and I’m usually not very good at creating a strong stitch. Those things don’t matter one bit when you’re transferring markings onto your fabric, though. And even though it took a bit of time, it was really easy! It even inspired me to hand sew the gathering at the collar later on, and that might have just changed my life.
  • I’m not racing to the finish. When I sew something up, I generally try to get to the end as fast as possible. And don’t get me wrong, I really can’t wait for this to be finished, as the weather is a bit chilly already. But, this time, I am taking my time, making sure to add personal touches along the way. One major way is that I am adding a red topstitch in every chance I can, and I am loving the end result. I’m using a thicker thread so the topstich is popping out and it’s really tying the lining in with the wool. It takes time to switch the thread every time, but it is so worth it.

Sew20Something

  • I’m adding to the pattern! I decided to add a lining to the hood because I wanted the plaid to pop when I had the hood out, and I am so excited about the result! I am also going to add in some sideseam pockets {hopefully with a nice warm fabric to keep my hands warm}. I haven’t decided for sure yet, but I think I might also make the cuff with half self fabric for the outside, and half lining for the inside. The pattern calls for the self fabric to wrap all the way around, but this wool is as itchy as itchy can be. I’m going to experiment a bit and hopefully the results work out like they look in my head.

So there you have it, the sneak peek of my Sewaholic Minoru Jacket!

Sew20Something

See you when it’s finished!

I Drew a Line, I Drew a Line for You

5 Mar

And it was all yellow:)

I have been absent from documenting, but certainly not absent from the sewing machine! There are so many things I sew for gifts and secrets that I would ruin a surprise if I blogged about it right away! I also have a commissioned project that’s going on right now that is taking up most of my time, and I am loving ever second of it!

In little spurts I have been sewing little things here and there, like a baby shower gift, and Love’s yellow dress to wear for her yellow themed 2nd (what?!?!?!) birthday party next weekend. It was such an easy, simple design, and I am thrilled with the result! Once again, I was able to use fabrics I had in my stash. The neon yellow skirt bottom came from my sister in law who actually got it from her grandmother (my sister in law had this hanging up as make-shift curtains in her master bedroom right after they built there house, and it turned their whole room neon, lol)

The bust and bow fabric is from my great grandmother in a box of unfinished quilting she had.

081

I just love using these fabrics. I love knowing where they came from, and how many hands have touched this fabric, contemplating what to make with it. I love knowing that my mother’s mother’s mother had UFOs (unfinished Objects) just like me. Maybe she would prefer WIP (work in progress), maybe she wouldn’t, she was pretty feisty:)

Simple Yellow Dress

She used to watch me when I was 3 or 4 and I always loved sneaking into her sewing room. It was a tiny little room that had a mini door leading to it (she was under 5 ft, and her husband was over 6 ft, so I imagine this was quite an escape for her, as he physically wouldn’t be able to fit in this sewing room). I often wonder if these UFOs were sitting there while a secretly glanced around, allowing me to experience this fabric in two different ways within one lifetime. 24 years later I am helping Granny make use of this yellow fabric that she probably lost interest in finishing after chasing after me:)

Simple Yellow Dress

I find it lovely to have these connections with people through fabric, and I pray that someday my children will find unique connections to me and my mother, and her mother and so forth. It may not be fabric, or even something physical, and that’s ok. But for the record, there will probably be a basement full of fabric for them to inherit:)

How to Dress myself {Basics: Navy Blue Skirt}

19 Dec

Phew! I’m finally finished with the pjs, and I got to sew something for myself! A while back I started to realize I need to revamp my wardrobe. I have a lot of clothes that simply don’t fit. partly because I have had them since high school, and partly because my body has changed in the last 4 years. I also took a pledge not to buy ready-to-wear clothing along with a bunch of other fantastic ladies!

So I started with a simple cotton, very light weight fabric that my husband bought a long time ago as a photo backdrop in high school. It’s still on the bolt. It’s a beautiful navy blue and the perfect color and texture for a staple A-line skirt. I didn’t use a pattern at all. It’s a square front panel and a square back panel. the top is gathered over the elastic. the only measurement I took was the elastic around my waist, and I used the actual elastic, not a measuring tape! Then I eyeballed the hem as the last step.

I used some no twist elastic for the waistband, and some hemming lace to make a wide hem just below the knee. I’m really excited about the versetility of this skirt, as I can wear it with boot ans tights for winter, or just a slip in the summer. I cardigan in the fall and just a tank if it’s warm. I can wear it with a simple tee, or a light sweater, and if I add a sparkly top, I feel it would transition nicely to a semi dress up.

Cost: 100% free, thanks to my stash.

ALSO, I am sooo sorry the mirror I used was gross. When you have toddlers running around, you tend to sneak in photo opportunities, and that sneak didn’t include walking past them watching Veggie Tales, increasing my chances of the distraction not working, just to get windex. Please look past the fingerprints.

Makes a beautiful wide hem. And a touch of surprise underneath.

Makes a beautiful wide hem. And a touch of surprise underneath.

Hemming Lace

basic staple, in navy

basic staple, in navy

My serger broke a thread, and I got annoyed, so I took a different approach.

My serger broke a thread, and I got annoyed, so I took a different approach.

Christmas Gifts Finished, Finally.

12 Dec

My family is no longer allowed to have children. Seriously, that’s a lot of pajamas!I’m not joking! {OK, I’m joking, I love all these kiddos and I want more more more!}
2 boys and a thousand girls {6 girls} Christmas pajamas have been sewn. I started planning this in September. And I will do it again next year:) I am hoping they will wear them Christmas eve!

Hand dyed flannel fabrics: Purple/Pink/Blue

Jersey fabrics: Green and Dark Purple old jersey sheet sets.

Florals: Already in my stash from grandma’s and such.

DIY ombre dye! Had fun dip dying the skirt fabric before I cut out the pattern.

DIY ombre dye! Had fun dip dying the skirt fabric before I cut out the pattern.

Vintage floral pattern was used to supplement my lack of purple fabric. I simply love the way this one turned out.

Vintage floral pattern was used to supplement my lack of purple fabric. I simply love the way this one turned out.

This is not my favorite style, but I was so happy to learn how to sew this!

This is not my favorite style, but I was so happy to learn how to sew this!

Oldest cousin's dress. I couldn't decide if she would like pink or purple better, so i did both.

Oldest cousin’s dress. I couldn’t decide if she would like pink or purple better, so i did both.

The Green accent in this dress actually pulls in the rest of the collection. {accidental, but I love it}

The Green accent in this dress actually pulls in the rest of the collection. {accidental, but I love it}

The simplest of the bunch for Eli.

The simplest of the bunch for Eli.

Special hem!

Special hem!

Fleece Pajamas

Each child that is receiving a separates set has a special stitch design.

Each child that is receiving a separates set has a special stitch design.

Olive's didn't get a bow, because when mommy is the seamstress, she skimps on yours! Promise I won't do this next year!

Olive’s didn’t get a bow, because when mommy is the seamstress, she skimps on yours! Promise I won’t do this next year!

Fleece Pajamas

Bow on the back of the booty, to match her newborn sister.

Bow on the back of the booty, to match her newborn sister.

Since this set is for a newborn, I add a bow on the bottom of one of the pant legs.

Since this set is for a newborn, I add a bow on the bottom of one of the pant legs.

This collar didn't exactly turn out perfectly, but I ended up liking the look.

This collar didn’t exactly turn out perfectly, but I ended up liking the look.

Fleece Pajamas

And ruffles:)

And ruffles:)

This very special girl loves the color green, so she got the green jersey instead of the purple!

This very special girl loves the color green, so she got the green jersey instead of the purple!

Lessons learned:

  • ask for waist measurements of all the kids {some of them might be too big}
  • This pattern’s torso length is insanely short. {Ruffles, and special hems were added to extend the length for the kiddos because I could feel it in my bones that they are going to be belly shirts)
  • Ironing freshly RIT dyed fabric results in discoloration.
  • Sewing the armseye on a size 5 or smaller is difficult unless you sew it flat}.
  • Sometimes I hem one pant leg in the rong direction, which means technically one pant is sewn on backwards. Thank goodness this pattern has a similar front and back.
  • I will not put in as much effort for my own clothing {or my own children} as I do for sewing gifts for other people. I hope to improve this.

So what do you think?

Snow White

14 Nov

My niece’s birthday is coming up in December and I’m ashamed to say I missed her in the planning ahead part of my sewing list. Between 3 other niece/nephew birthdays and 8 niece/nephew Christmas gifts, I missed it. But! That was in September, and I remembered her birthday in November, which is still a month ahead of time, so I really could have done worse! Anywho, she’s all about dress up. She was Cinderella for Halloween and I asked her mom which princess dress she would like that she didn’t already have. Snow White! I used the dress pattern that I will be using for her Christmas pajama dress, so it really worked out perfectly. The only thing I changed were the sleeves and collar.


Olive is modeling it here, she’s a whole size and a half too small for the dress {and she is a cranky little munchkin today} so bear with me and the quality of the pictures:)


Super, cranky. “Maaaammmmmaaaaaaa, soooooocccckkkkks” She really wanted socks on.

I even made a little red bow and slid it onto a clip. 

The sleeves are pleated in the actual fashion of Snow White’s dress. Box pleated at the arm cuff, and opened slightly to ease in the armseye. 
The lion was the model before Love woke up, and frankly, he might be a better model. I’m not sure:)


Sewing a T-shirt V-Neck Band {Tutorial}

1 Nov

I am making a billion {8} knit pajama tops for Christmas gifts this year, and I have gone from feeling intimidated by neckbands, to feeling pretty comfortable with them. I thought I would share my step by step with you, just in case someone out there might need some second reference. I am using a walking foot, and crazy old leftover jersey sheets. This is a 4T sized neckband, so don’t be alarmed at its size:) I mainly use the lighting bolt looking stretch stitch on my Bernina, and a stretch needle. I wish I had a ballpoint needle {you’ll see why later}.

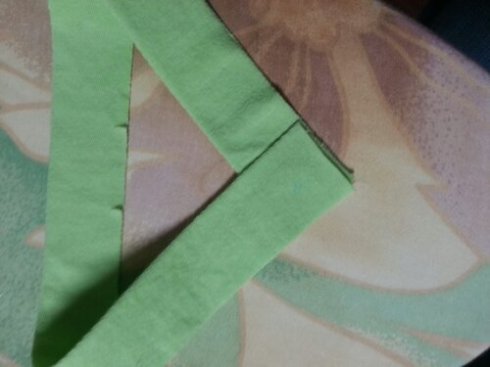
Overlap your neckband. Right over left, or left over right, do what you please.
image

Baste the ends of the neckband together along seam lines {I did 5/8in}, though all thicknesses.

image

Basting the second side, forming an X.

image

Then Baste up the center, to make a star {*}

image

It will look this when you are finished. I also reinforced the center front of the shirt. I was careful not to stretch the fabric, and I used a normal stretch stitch. Then I snipped the V right to the dot, being careful not to snip my stitches that I just sewed.

image

Next up, I made sure to complete the neck hole, by joining the sleeves right sides together. No I’m ready to put the band in!

image

It’s really hard to show this in pictures, but I did my best, so here goes.

With right sides together, pin the neckband to the neck edge, matching center back notches, and aligning the shoulder seams with the dots that match. Match the center front dot on the shirt front with the center of your star, and pin.

image

Here you can see how I pinned the V. {There will be a lot of extra fabric in the V on the other side, I made sure the head of the pin was lined up in the center of the star and went all the way through the center dot to match them up, then the rest of the pin goes through to keep the pin in, not to hold the gobs of fabric in place}

image

On the wrong side, start sewing at center back, adjusting the fabric as you go to match notches, and dots accordingly. {The band is slightly smaller on purpose! That ensures it to lay flat when finished.} When you get close to the V, take the needle that is matching the star and center front dot out half way. Keep the needle poking out so it still keeps the matches together, but doesn’t direct the rest of the loose fabric. {Watch out! It’s pokey}

image

Sew along the 5/8in {or whatever your seam allowance is}. Keep the raw edges together, you will still be sewing a straight line, and the shirt front will be flat against the band, where you are sewing {but not on the other side of the V}. Sew until you hit the center of the V, which is also the center of the star, keep your needle down and get ready to pivot. {I can not say the word pivot without screaming it in my head like Ross from Friends}

image

Needle down still, lift your presser foot up. Rotate the neck so that your now facing the rest of the V. You’ll want to adjust the excess fabric so that this side now lays flat and the raw edges align. Lower the foot, and sew the rest of the neck, all the way around, easing in the shirt to the band and continuing to match dots and notches.

image

This is what it will look like. {hopefully} Sometimes I mess it up, and I rip it out and do it over. Or, I call it a feature, convince myself I like it better than the normal and leave it. It happens, we’re human.

image

Then I sew another reinforcing line just inside the original line.

image

Rip out the basting seams. There are three, and go carefully. You do not want to rip out the ones you just worked so hard to get right. I will actually pull out the baste  seams when I can, grabbing one of the ends and pull slightly, sometimes they pull right out, sometimes they need the seam ripper.

image

Then you have this beautiful V. {I was using a stretch need but it’s not ballpoint. I recommend a ballpoint if you are worried about the basted lines showing}

image

Here’s what it looks like on the other side.

image

I pressed it.

image

Then serged it. If you don’t have a serger, you don’t need one. Just go straight to the top stitching.

image

And the other other side’s view.

image

Topstitch. Use a fun stitch that has a stretch to it, this one is slightly thicker of a stitch. I start at the center V and just go around if I am using a crazy stitch and just overlap them at the end. I like the look and it’s easier than trying to guess when the needle is going to be going forward or backwards. If your using a regular stretch stitch or zig zag, you can get fancy, start at the center back and then keep your need down when you get to the point of the V, rotate and have a lovely finished V.

image

I saw that some of my foundation stitches showed through here, so I ripped them out, and used some water to erase my water soluble ink dot.

image

And here it is!

image

He Finally Settled for a Lobster

31 Oct


I was SO excited for Halloween this year. E’s first year in preschool, and I just knew they would have a costume party. They did, but the ride to get a costume that E wanted to wear was a mess. He changed his mind more than he has about anything else. Usually he knows what he wants and sticks to his guns, but not this time:) He was finally excited when the time came. He even wanted to get dress at home, before he saw other kids wearing costumes! 

Add a whole lot of “I don’t want to dress up as anything!”s in between, and this is how our Halloween costume conversations went.

1: Alpha Pig (95% made) 

2: Lobster! (Changed his mind, no lobster)

3: Wyatt from Super Why (Made the Cape, and he refused to wear it)

4: Lobster! (Success!)

We had a better set of eyes but they got lost when we went to the trick or treat at the zoo. That night was a disaster filled with freezing rain and 3 vendors that showed up because of the rain, when there should have been hundreds (which meant barely any trick or treating).

My sister found a red pajama onsie at a thrift store, so really this last minute costume came together in a flash. I just sewed up a stuffed lobster tail, and two big pinchers, then pinned them on using safety pins. I thought about sewing it right on, but my nap time sewing time slot ran out, so safety pins won!

Eli attends a preschool at our local Career and Technical specialized high school. His teachers are mainly high school students who are learning Early Childhood education (he also has two adult certified preschool teachers who manage the highschoolers and guide them in their teaching the children. Seriously, I love this program. It’s amazing. Anyway, this brings awesome opportunity for him, and today, it meant they got to tour around in a costume parade to the whole school! Teachers and students loved seeing the wee ones all dressed up as they went door to door trick or treating.
The high schoolers learning to be firefighters dressed in full gear to hand the kids candy, and of course the kids went crazy over it! Seriously a blast! I love how Eli’s little lobster claw has to reach in to grab the candy!

We still have trick or treating in our neighborhood to do tonight, which would make 3 costume wearing events this year for Eli! 2/3 he has worn the costume. Here’s hoping tonight will make it 3/3!


Progress

5 Oct

Just wanted to post really quickly to update. I’ve finished two pajama sets and one pant as well. Which leaves 2 more pants, 3 shirts and 3 pajama gowns. It’s going much faster than I anticipated, which is really awesome!
I’m experimenting with fancy machine stitches so that all of the children’s sets are similar but unique:)
I finished most of Eli’s Halloween {or olive’s} ahead if schedule and might just take a second look at my thurlow trouser muslin in order to do the sew along since I’m so ahead of schedule!

I also got started on my niece’s birthday crayon roll up. I found some wipe-able fabric in my many scrap stash boxes and a pre-sewn quit block that’s just the right amount of girly! I’m using both fabrics and I couldn’t be more excited to see how it turns out!

Really I feel amazing about my progress and can’t wait to take some photos of it all finished to show off to you guys!

Anyone else making good progress on handmade Christmas gifts?